A Lovely DIY Gift Display That is a Perfect Fit for Any Lolita
I hope you all have had a wonderful start to the holiday season! I have experienced a lot of inspiration this year when it comes to festive decorations. Perhaps it is due to the cold weather? In any case, my apartment has started to look adorable and a picturesque winter wonderland. These picture frame gifts are just one of the fun and recent additions to my holiday theme, and I wanted to share this simple holiday project with you!
You will need:
✓ Scissors
✓ Pastel Wrapping Paper
✓ Pull Gift Bows
✓ Picture Frames
✓ Gift Ribbon
✓ Scotch Tape
For my picture frames, I chose one that contains a poster of one of my favorite films, and another I had recently purchased to see which would be easier to wrap. I found that the brand new and sealed small golden picture frame was easier than I opened one. I decided to have two different sizes for variation as well.
I chose pastel pink and pastel blue for my wrapping paper, silver pull gift bows and silver gift ribbon for my projects. All of my items were obtained for $1 from my local Dollar Tree!
Completion Time: 10 minutes!
Step One:
✓ Choose your wrapping paper
✓ Choose your frame
Roll out your chosen wrapping paper flatly onto your work space. Lay your picture frame in the center of the wrapping paper. In order to keep the wrapping paper flat, feel free to use your metal scissors to hold the edges of the wrapping paper down. On the free side of the wrapping paper, fold over the jagged display until you have one clean, straight and folded edge.
Step Two:
Once again, roll out your chosen wrapping paper flatly onto your workspace. Place your picture frame in the center of the wrapping paper. Once you have found the desired length and width dimensions, use your scissors to cut your wrapping paper free from the roll so it is only a single paper sheet. In order to keep the paper flat, feel free to use your additional frame and metal scissors to hold the edges of the wrapping paper down for ease.
Step Three:
Next, line up the frame with the wrapping paper. Secure the free wrapping paper edge, the one that does not have the straight edge, to the back of your selected frame with your scotch tape. Once you have that side secure, place your perfected edge over the top of the less than perfect paper, and secure the wrapping paper with scotch tape. Fold over the bottom edges into two triangles before you make another fold to secure the bottom and the top.
Step Four:
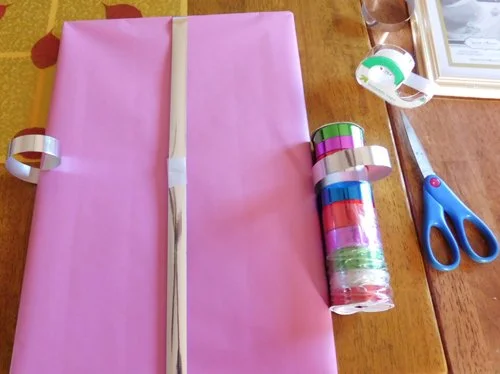
Inspect the front of your piece. Your covered frame should be secure and flat. If the front if your piece looks good to go, place the plastic ribbon vertically on the wrapping paper. When you can cut the ribbon, so the ribbon appears to be a single piece, use your scissors to snip the ribbon. Place the two pieces of the ribbon end to end and secure them together with a square of tape.
Step Five:
Using the same steps as above, repeat the steps for the horizontal ribbon. As with the verticle ribbon, you want to make sure you match the edges of the ribbon together in an even line. Secure with tape.
Step Six:
Take one of your pull gift bows, remove the protective back and secure to the center! Not only does this cover your tape, it also helps add a definitive finish to your piece. You cab add a gift tag, too!
Tada! Your first project is finished!
Now repeat steps one through five for the second frame. In order to add another pop of color, I chose baby blue . The brand new frame wrapped in plastic was much easier to wrap than the first!
Since you used a picture frame as a base, you can easily attach your piece to a peg or nail on your wall. It's super easy to do!
Your wrapped picture frames are picture-perfect!
I hope you have fun with this project, and I would love to see pictures of your completed frames!


